Showing posts with label US. Show all posts

Tuesday, October 19, 2021

The first modules

 Started with some preparations. Still had 1 small modules from a previous project but they got water damage from store them... Took them out of my garage and put them in house to dry them with the heater on. It took them a week to dry:


After a week they dried good:


After they dried I took them out to make them connect to each other. I also had the lightcoves that belonged to them. Originally they where bolted to the module, now I glued them together:


2 new tops on the modules:


And in place:


Lightcoves bolted together:


And glued to the module backwall:


This will be the base for the new ACW H0 layout. To the left and right it will have staging yards of 2 feet long. Then the whole layout will be 4 feet staging + 8 feet of layout. So together 12 feet long and 1 foot deep.

Basic of the plan will be a design of Bernard Kempinski he drew for a possible ACW road show. It containes Alexandria and is called "USMRR Union Street switching district". I liked it so much I will adapt that name to my layout:


So far so good, keep you posted!

Grtz, Ronald.


Saturday, September 15, 2012

Some 28mm stuff usable for 1:55 and the painting technique

I ordered some stuff last week from Perry Miniatures (http://www.perry-miniatures.com) for the project. The figures are all metal and lookes very good. The tents are plastic and also are good to use.

The stuff:


The metal guns and a set of Confederate Generals:


Loose assembled gun:


Together with a friend of mine who has a good painting technique we start painting these the 29th of September. We are in a group of modellers who will meet that day. This group has as a purpose to have fun in the hobby and to take it to the next (=higher) level. All have there specialties and I am one of the guys who does American modelling.

How we paint? Well, this way. These are 1:72 figures but the way to go is the same.

Basic black with first deails painted:


The colours on the uniform:


Left mine, right his painted example:


And another one to go:


It's not as hard as it seems. So I will go one with the bigger ones.
More to come!

Grtz, Ronald.

Saturday, September 1, 2012

New start!

Hi all!

After a longer period some new things.

At this point I can't get enough information about Tenessee and its station.... therefore the subject is no longer available for a good modelled layout. What I'm looking for now is a subject that can be moddeled in the limits of 7 foot long and 1+ foot deep. I build myself 2 modules, one of them was already build in 2009 and was determined to get a same module with it. But for me it is important that a layout is buid for exhibition purpose and that it can be transported easaly. As I have a sedan there is not much room to get a layout stowed in. So what I did was that I made a shorter second module that fits in the trunk of the car and can be coupled to the first one.

The first one can rest on the back seats. On this picture its the left one. The right one is the new 2012 piece that fits nicely to the older 2009 piece:


The older one had a cornered background. Until that time I only modelled 90 degree cornered backgrounds and so I wanted to try new things. Unfortunatly it came in storage and wasn't used untill now because I needed something that would fit in a car and not only in a hanger or van (the idea of that is that I can travel "light":  one or two persons and a lyout. Perfect for 1 or 2-day trainshows and the smaller ones. Those have fewer money to organise so expenses are much lesser that when I have to travel to big trainshows where I need a van and 4 to 5 people to operate my layout on these intensive shows.)

The second one is this one:


And it fits in the trunk:


Here are both modules after we finished it with oak veneer and stained it:


Sorry, picture will not turn in blogspot....:


And the two with the first coat of blue background paint:


So, here is my base for a American Civil War roadshow in Europe. My plan is to follow a idea of the Englishman Iain Rice who worked out a concept with parts of a layout that can be exchanged with eachother. That means that you can put pieces with different syles of landscaping  in the layout during a exhibition. One example could be different time periodes but also different places.

Later more of it!

Grtz, Ronald.

Tuesday, January 24, 2012

Hello folks,

I'm hard ay work on another project of ours; a 5-module 0N30 layout with a Southern State appearance. It is called "Lake Louisa RR, John Hammond's swamp logging". Rail and turnouts are all handlaid code 80 on ties that are made of mouth sticks your doctor uses to look in your throat! Most buildings are made of wooden cofee stirsticks. I will show progress photo's in a few days.
Here some of the building. Me and my wife, she will do most of the scenery and the buildings:


Progress this week of the middle 3 modules:


Deadline is the last weekend of Februari where I will take it to Germany at the yearly show of the MEC Lahnstein-Koblenz in the village of Lahnstein. The week after that it will make it's official appearance at the OntraXS show (www.ontraxs.com) held 2, 3 and 4 March in the Dutch Railway Museum in Utrecht Netherlands.

After that show I will start with the building of the Civil War layout. Idea is still 2 modules with a staging yard. Above that I want a diorama in the same size as the modules. So that there is a distinctive feeling with the theme I'll show.
This layout will also have its premiere at the Ontraxs show in 2013. After that it will go home with me and will return to the museum in their yearly season exhibition. In the year 2013 it is a war theme with different real carriages and locos from around Europe. They also want to display some dioramas and my layout will be the focus point as layout/diorama that shows trains in wartime at a very early time in history.
I can tell you that I'm very proud that they asked me, also because there is still nothing build....

More to that later!

Thursday, November 3, 2011

Wednesday, November 2, 2011

Working on my rolling stock

Past weekend there was a big trainshow here in the Netherlands called "Eurospoor". I was there Saturday and Sunday with friends from a Dutch internet forum called "Beneluxspoor.net". I have several building threats there and these days I demo-ed the building of styrene rolling stock.
This is what I managed to do in ample 2 days:

Me at work:


The 3 cars I completely build:


And the cattle car I already build with some other stuff displayed:


It was very nice and I learned a lot these 2 days off building from scratch. Further I met a good Dutch friend who is very experienced in scratchbuilding with styrene but also with remotering projects. He opted that I could use motors from cdrom or dvdrom drives and that these motors are almost the same as the original Rivarossi motors. He took my 4-4-0 that was on display and took it home to re-motor. At night it was ready and he opted that I would do the rest of my locos (the Rivarossi ones). So thuesday I went to the secondhand store and bought 2 old drives for approx. $7,- . Later at home we (my son and I) took the things apart to harvest the 2 motors in them:

The drives:


And what we harvested:


The first motor on its place. Glued with acc and hot glue:


But testing showed that it sat to high in the tenderfloor:


Then I cut a small strip out of the floor and glued the motor in place again:


And see; it sits much lower than the first attempt:


I was very satisfied and made a testrun: http://www.youtube.com/nlron#p/a/u/1/R_uR8QttOEs  And it runs much better then the original. But could it be digitilised? Yes, it could.... I put some 50 grams extra weight in the tender and put a Lenz Silver+ on the bottom. 
And it runs good!: http://www.youtube.com/nlron#p/a/u/0/vVUDGt4YEFk  This was untuned and a not cleaned loco. Further tuning is necessary but I'm on the right way I think!

I also did the other painted tender I already had rebuild:


More to come!

Tuesday, October 18, 2011

Making ties

Made a batch of ties today. I make them from sticks we use for meat etc. I can make 5 of 1,5 inch length out of 1 stick, there are 100 sticks in a bag so in half an hour I produce 500 ties!:


Saturday, October 15, 2011

The legs

Today I made the legs. I still had a set of 3 from a previous project layout:


Me with the layout. Not looking amused, but that is not the case. I'm very happy with it. Maybe I am camera-shy....:

I made a mock-up from some cart material and a photo as reference:


And on the module:


I think the dimensions are pretty good. More in the coming days when I will make the other 2 buildings (the middel high one and the one with the locoshed attached to it).

Friday, October 14, 2011

More construction

Today I went on with the construction of the first module. The idea here is to make the "roof" with the lights removable for transport. That way I can "box" the two modules for transport.
Here the front bottom fascia is made. In two pieces, its made of left-over material from a previous project:


With background:


And the first roof-carrrier (not quit straight mounted yet):


All three of them, together with a mounting strip for a tube light:


I used temporary support for mounting the roof and for lining out the 3 carriers:


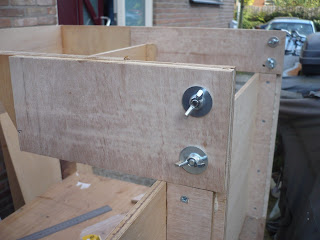
Twin bolts hold the carriers:


And ready with the roof straight over the module:


And it can taken off quickly:


The inside with the way how the tubes will be placed:


More in coming days!